

|
Introduction Problem and concept Acquisition Film transport Lighting Post-processing Results and future Links |
Post-processingThe images were originally captured to an AVI file by IC Capture, which is the software application that comes with the camera. Custom capture applicationHowever, in the interests of trying to improve the workflow, an application has been written to replace IC Capture. It is really a subset of IC Capture working with RGB24 formats only, but with some additional processing controls and targeted at this particular need. These controls allow setting of:
Interestingly, one can see that the black level in the histogram is about 4-5 stops (except for the left one, the white lines are stops) down from the max level, and in fact that is also what one gets with no light at all, ie with the lens cap on the camera. This would seem to imply that 4-5 stops is the effective dynamic range for this particular camera. Fortunately, transparency film has a similar limited range, but it shows the importance of adjusting exposure and light level to use as much of the range as possible (the example shown wastes about 1/2 a stop). In addition to that the application has controls for the necessary device properties, the codec and stream file, and can load and save all its parameters. There is a separate (settable size) window for viewing the live output. None of this is anything that cannot be done with IC Capture and then via post-processing with AviSynth, but it keeps it conveniently all in one place, and avoids saving to a file, reloading modifying and saving to another file. It also has the benefits that changes to settings can be viewed in real time. The UI probably looks very 'busy', but it was a design goal to have all the necessary controls in one window, rather than split across tabs. It probably also looks like a lot of work, but in practice the whole thing was written in one week (start to finish) in C++ using the IC Imaging Control 3.2 class libraries, using Visual Studio 2003. The libraries are very comprehensive and easy to use (they are also what IC Capture itself is built from). All this processing has to be done in real time while the images are being captured, so the processing time is an issue (the codec itself and/or uncompressed file writing uses a lot of bandwidth). However, all the above corrections come down to one look up table: FOR each pixel OutputRedPixelLevel = LUT[InputRedPixelLevel] OutputGreenPixelLevel = LUT[InputGreenPixelLevel] OutputBluePixelLevel = LUT[InputBluePixelLevel] ENDFOR So actually the run time is in the range 4-9mS per frame on my PCs (all of which are fairly fast), or around 2nS per pixel. It approximately doubles when the histogram is enabled, which is why it is possible to turn it off (the histogram is only really needed during setup, not during actual file capture). This runtime concern is partly why no processing such as saturation, sharpening or noise reduction is done here - these algorithms are much more complex and take much longer. Processing corrections appliedThe real problem is the quality of the films and exposure. As stated earlier, transparency film is not very tolerant of under or over exposure, and since the only metering was the averaged metering from the camera (an incident light meter would probably have helped), the exposures can change wildly from under to over exposure on adjacent scenes, or even during scenes. The capture process then unfortunately accentuates that. Generally speaking, unless the exposure is very light, some sort of gamma correction is required. It also seems possible that the super 8 films may require slightly more - whilst the resolution of super 8 films is improved by virtue of the larger frame size, I do get the feeling that the range and colour of the regular 8 films was superior, but it is very subjective. It may be Kodachrome vs. Ektachrome. The black clip levels are set to remove any cast in the shadows, and the while levels similarly for hilites. The image sensor gain is set to minimum and the exposure time set appropriately (1/4 F stop increments). All of these are factors relating to my actual lightsource and lens, however, and the readings as displayed should not be taken as any sort of guide. Workflow
Although the codec is lossless, conversion from RGB to YV12 itself causes a 50% loss in colour resolution in each dimension. However as the camera has a single image sensor with a Bayer filter that extra colour resolution never really existed in the first place. It would be possible to compress as RGB, but the file size would approximately double. It was originally intended to convert each file before import to Magix to the correct MPEG 2 format using the AVS4YOU video converter as the Magix tools are better at handling MPEG 2 imports than MPEG 4 (originally used before Lagarith), however the DVDs created this way appear to show green bars on some TV DVD players. The reason for this is currently unknown, but as the Magix tools handle Lagarith well, it seems irrelevant now anyway. Coping with varying exposureUnfortunately, it does not seem possible to come up with an automatic scheme for adjustment. How would it know, for instance, the difference between the exposure going wrong, and the fading out a sunset? The attack / decay response time for scene to scene adjustments would also be very difficult to get right, accentuated by the fact that one of the cameras used would drastically over-expose the very first frame of a scene (probably as the transport mechanism came up to speed), and this would tend to shut down any auto-exposure mechanism. It would appear therefore that if ultimate quality is required, there is no substitute for very slow manual scene by scene exposure adjustment. In reality of course, if transparency film is significantly under or over-exposed, the damage is done and cannot be undone. |
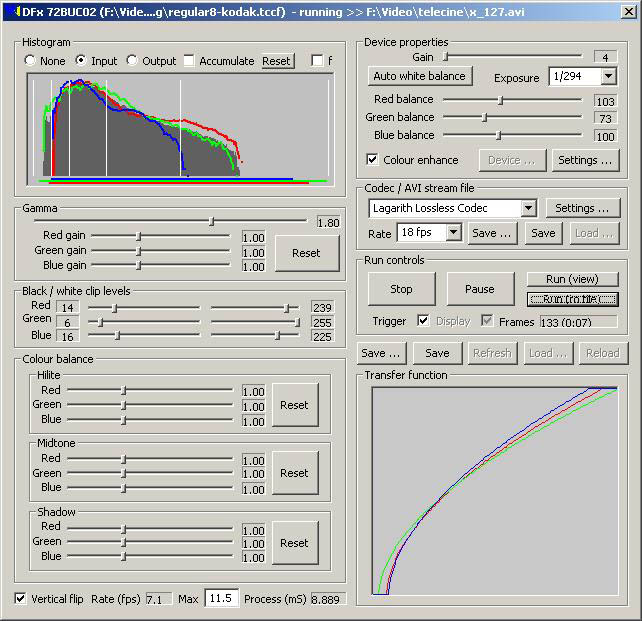 It also provides an RGB histogram for seeing the spread of the image (viewable on input or output), and also a transfer
function graph to see the applied image processing transfer function.
It also provides an RGB histogram for seeing the spread of the image (viewable on input or output), and also a transfer
function graph to see the applied image processing transfer function.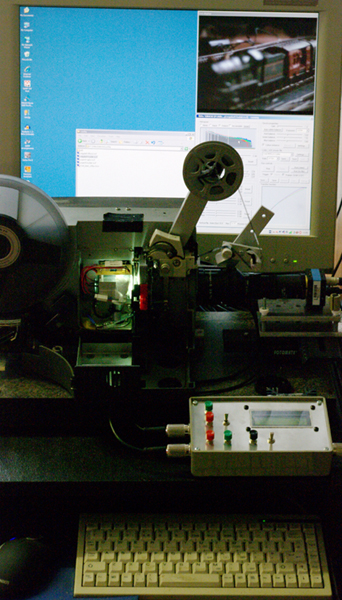 The way all this is currently done is as follows: