

|
Introduction Problem and concept Acquisition Film transport Lighting Post-processing Results and future Links |
AcquisitionThe first key decision is the camera and lens to use, as it drives pretty much everything else. The idea is to remove all the lens assembly and mount from the projector, just leaving the film exposed in the gate, then to use a camera and lens focussed down on the film frame to capture the image directly at approximately 1:1 magnification. Since the original light source will also be removed (see later), there is nothing belonging to the projector left in the optical path - the projector's job is simply to move and position the film, then signal that a frame needs to be captured. CameraCameras fall into two main groups - CMOS and CCD. In the past it was always felt to be the case that CCDs gave the better quality due to lower noise level, though reputedly this has changed in recent years. This is an application where dynamic range is absolutely key if one wishes to avoid continual scene by scene adjustment to the light level and exposure, and therefore so is noise. However CCDs have one big disadvantage - they cost more for a given resolution. CCDs (and occasionally some CMOS) have a further advantage - they have global shutters. CMOS cameras tend to be rolling shutter. The difference can be found well explained elsewhere, but fundamentally CCDs have a backing store: the exposure is made, the information moved to the backing store and can be read out at one's leisure regardless of how exposure of the sensor subsequently changes. With a rolling shutter, the array is exposed row by row, and therefore whilst the actual exposure may be 1/1000 second, the actual readout and transfer to the PC takes far longer, and if the image changes during that period some very strange effects occur (wobbly verticals etc). It is analogous to the focal plane shutter on a 35mm SLR. In this case however, rolling shutters don't matter - the film is supposed to be stationary during the exposure / transport phase. There would be a minor benefit to a global shutter in that the 10% of film movement time could be used for data transport to the PC thus speeding up the frame rate by roughly that percentage, but that is a minor point, and in any case in the camera range I chose, the CMOS transfer rates tend to be slighly higher than CCD anyway for some reason which cancels out that CCD benefit. Therefore the decision was made to go for a CMOS rolling shutter camera from Imaging Source (DFK 72BUC02), purchased from Scorpion Vision. Freddy van de Putte uses the same make, though in his case a CCD. The camera chosen is 5MP, and is being run in a 1280x960 pixel with 2x binning mode (pixel binning reduces noise at the cost of reduced resolution by combining pairs of pixels horizontally and vertically into one logical pixel, so in fact it is using 2560x1920 pixels). At that resolution it can theoretically manage about 19 frames per second, free running over a USB interface (USB also chosen for cost and simplicity - GigE would have been nice). I have been warned that this may not be an ideal choice. There are a number of issues:
Imaging Source cameras certainly do appear to provide a lot of bang for the buck, so time will show if this camera was a good value for money choice or not. LensThis was definitely an area of mistakes - several in fact. Given the relative sizes of the image and sensor, macro photography is required, somewhere around 1:1 or slightly greater. Macro lenses are available (the camera has a C mount), but are very expensive. So, the choice was made to use an ordinary lens and extension tubes. The focal length is quite important. At 1:1 the lens will be equally spaced from the film and sensor, being about 2x the lens focal length in each case. (Exactly where the theoretical single plane lens is within the ~55mm physical length of a practical lens depends on the lens). If the lens focal length is too short, it may not be possible to get it close enough to the film because of physical restrictions in the projector. If it is too long, then it is going to be too far away to manage easily. A 35mm lens is too short to fit without clashing with film transport mechanism, and a 75mm lens, while workable, is inconveniently far away, and the further away, the more vibration and relative movement between camera and film starts to be noticeable. 50mm is about right. The lens originally chosen was a reasonable quality 50mm F/2.0 machine vision lens. Unfortunately whilst doubtless adequate for its designed purpose, macro use was not it, and in practice it gave very poor performance at 1:1 macro at all apertures. It proved impossible to get red, green and blue all in focus at once at any aperture - there was a lot of colour fringing and it was very soft. Following Frank Vine's advice I have acquired a Schneider Componon 50mm F/2.8 enlarger lens (M39 fit, 43mm filter). This has proved to be extremely sharp with no sign of fringing and is being used at F/5.6 (most lenses work best two to three stops down from maximum aperture), not to mention much cheaper. Frank Vine has his mounted reversed on the grounds that the magnification just exceeds 1:1 macro, whereas mine is mounted normally.
Then following that there is C to M42 adapter, then an M42 to M39 adapter. Finally the (enlarger) lens. The film image just fills the 1280x960 camera frame with these degrees of extension, although the extension tube length required in practice depends on the length of these particular adapters. An M42 bellows unit would have been an alternative to give continuous adjustment. However, it would have needed modification to avoid clashing with the projector, is likely to be less rigid, and also in any case only two preset magnifications are required. MountingThe whole assembly, projector and camera, needs a rigid mount as at such magnifications virtually no relative movement between camera and film can be tolerated, and the projector, with its frame pulldown mechanism, does vibrate.
To allow adjustment the camera is mounted on a Fotomate X/Y macro platform for 35mm cameras. X provides focussing, Y side to side alignment.
The camera is then mounted on the top plate. It is not ideal because the movements involved for alignment and focussing are so small, and the mechanisms are a bit coarse, but it is workable. |
 The camera C mount
(first there is a 5mm
The camera C mount
(first there is a 5mm 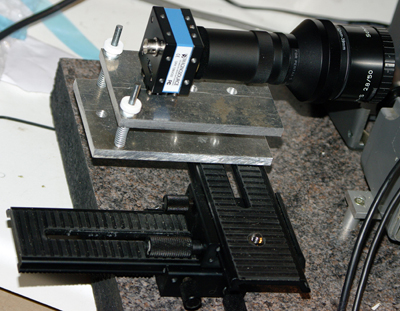 It is all mounted on an offcut of 2" thick kitchen worksurface.
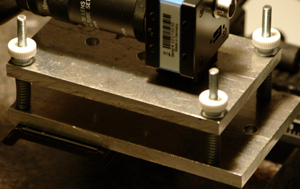 On top of that is an alloy plate, with a further alloy plate mounted on that by three corners separated
by M4 studding, spring loaded with knurled adjuster screws. That allows Z (up and down) adjustment, and also pitch and roll.
On top of that is an alloy plate, with a further alloy plate mounted on that by three corners separated
by M4 studding, spring loaded with knurled adjuster screws. That allows Z (up and down) adjustment, and also pitch and roll.