

|
Introduction Problem and concept Acquisition Film transport Lighting Post-processing Results and future Links |
LightingOne of the most awkward parts of the project. The normal lighting in the Dualux is a 50w tungsten lamp. That isn't needed or desired. Firstly it is very inefficient and puts out a lot of heat, and secondly very little lighting is required. Therefore it was decided to use power LEDs. There were two choices:
For simplicity it was decided initally to go for the former, and the tungsten lamp was removed. The Dualux also has a piece of hardened glass between the film and lamp for thermal protection. This was also removed. The initial light source was a Luxeon Lumiled I 'cool' (5500K) white LED (on the wishful, but erroneous, assumption that they would have a fairly flat output power spectrum). These can run up to 350mA. It was mounted at the back of a 45mm square anodised tube, internal dimensions 17mm x 17mm, with a plastic sheet diffuser on the front. This was mounted so that the diffuser was approximately 15mm behind the film plane. The LED (lambertian pattern) has a fairly wide beam angle and the internal reflections in the anodised tube would also help. Various diffuser materials were tried, but the current simple solution is a very mild diffuser half way down the tube, then at the end on the tube, a section of white plastic bag! An small marks or irregularities in that are lost because the depth of field is so small. The electronics controller can set the current and therefore light level, but that was really a waste of time for a white LED because what is required is all the light one can get because (a) it allows more diffusion (which soaks up light) and (b) shortens the exposure time. This worked, but green grass lended to look a rather dirty greeny / yellow. The possible cause for this was found in the spectrum of the LED, which isn't flat at all but has a large hole at the lower end of green then a sharp peak at blue. (The warm white LED was more consistent in that area).
Therefore a new LED holder was made - 40mm long square tube, internal dimensions 20mm x 20mm, which held four Luxeon III LEDs - two white and two cyan (on diagonals) - running at a total current of 1.25A.
The image shows the LEDs at the far end, viewed from the open end of the tube. The light seems quite well spread and diffused, helped by the internal reflections in the tube. The LEDs are also angled to point at the centre of the diffusion screen. The whole thing is a bit of a compromise though, and it would doubtless be better to have an array of red, green and blue LEDs, suitably balanced and diffused. Or, more simply, and array of four warm white LEDs (without the spectral hole).
|
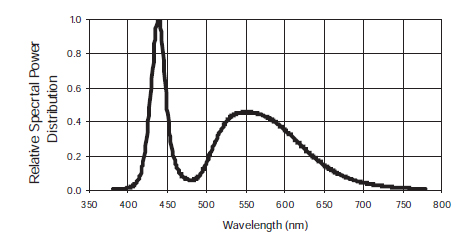 The 'hole' is in the turquoise / cyan
area rather than green, so it was decided to try adding cyan.
The 'hole' is in the turquoise / cyan
area rather than green, so it was decided to try adding cyan.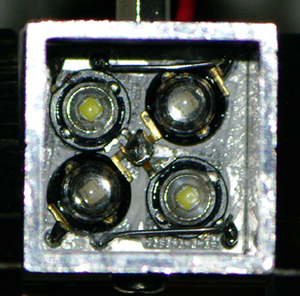 12.8% of the current went to the cyan LEDs,
the rest to the white. This seemed to help a bit, and the exposure was also shorter.
12.8% of the current went to the cyan LEDs,
the rest to the white. This seemed to help a bit, and the exposure was also shorter.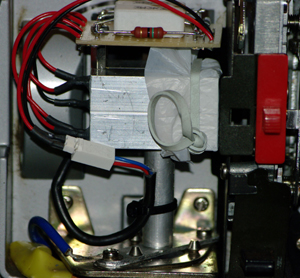 This picture shows the mounting of the LEDs. These particular Luxeon LEDs appear to be obsolete now, anyway.